Getting Organized. With all of the rush and the worry of the first week, it is easy to get disorganized. As a teacher, this is super frustrating when it happens. You go to find an assignment, or paper, or you forgot what you assigned for homework because your room becomes chaotic. We all know that our classroom needs routines and you need engaging activities to keep your kids focused. Here are a few tips for keeping that first week running smoothly by getting your organization in place.
1. Create a homework board. Divide it up by days of the week and subjects. Assign a student to fill in the board
as soon as an assignment is given. You can always go back and modify it later, but this gives the kids an immediate and constant visual, and takes the work off of you. Establishing this routine from day 1 eliminates questions at the end of the day regarding homework.
This tool has proven to be immeasurably helpful throughout the years. I list my assignments online for parents and kids, and I use that board to keep everything in order. I no longer have kids who can come in and say they were absent and weren't aware there was homework. Parents have stopped in and checked my board because their kids claimed to be homework free for the night. Having a week long planner also helps me see if I am giving too much or too little homework at any given time.
2. Binders and folder holders are your friends. Every subject I teach has it's own binder and folder holder. I used hanging folders for two years and destroyed my materials. They got squished, crushed, folded, and I was constantly pawing through them trying to find what I needed. Finally, I wised up, spent a little money, got binders, protective sleeves, and my teaching life became much easier!
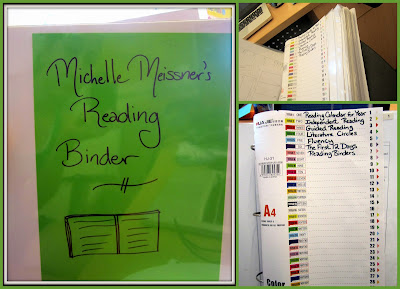 |
| ~My ever growing reading binder...look at all those pages!~ |
Does this take time? YES. You have to be diligent about not letting papers pile and pile and pile up! I go through all of my binders before the first week of school to review what I have, check if I need copies and add information I've created over the summer. I try hard not to keep loose sheets of paper or to 3 hole punch papers and put them in the binders, otherwise, it's pretty much like keeping your work in hanging file folders. Each item is in a plastic sleeve and they are sorted according to a particular category. At the end of each day, I collect all of the papers around the room, sort them back into their binders (or put them in the daily folder) and then I breath easier because I am not chasing down loose sheets of paper.
I use binder holders to keep all of my resource material together. Again, hanging file folders destroyed a lot of the resources I had spent a lot of money on. Here's how I keep my folder holders right now. (I am working on creating nicer binder covers, indexes, and folder holder labels):
This helps me keep everything out in the open, teachers, parents, even some kids have asked to look through the books I have. I don't forget which resources I have or which subjects I can use a workbook with. Parents who want to further challenge their kids at home, can easily browse through my materials.
3. Organize everything BEFORE day one! I am constantly amazed at teachers who come in at the start of the school year and leave cabinets filled with piles of art supplies, drawers filled with who knows what, and then complain about their disorganization halfway through the year. People! Organize yourself! Spending 2 extra hours to organize, label, and sort your materials will give you peace of mind for months, if not the whole year! You will know
exactly where everything is! You won't have to scramble, dig, and cause more mess than needed. Purge and clean! Even your desk should have some semblance of order.
4. Create an organized library. I walked into a classroom the other day and the library had absolutely no order! Can you imagine what kind of chaos will happen when the kids get in there?!?
To prevent this from happening to you, spend some time after school and get your library together. Do not let your kids use it until you have it complete. Put an "Under Construction" or "Coming Soon" sign which will build positive suspense.
Some schools have certain ways they like their libraries set up. We have freedom to set up our libraries as we want and working with upper level elementary school learners I try hard to steer clear of leveled baskets and stickers as it isolates the kids who are above or below their peers. (I tried the leveled books once in a 5th grade classroom and NO ONE touched the lower level sticker books, even though there were learners who knew that was their "just right level".)
I try to promote authors, series, and themes as best I can. Go through your library and sort books by authors first. The ones with lots of books, get their own book baskets. I keep these by my reading chair and try to promote a different writer each week. Next, organize your series. One bookshelf in my room has all the series, another is sorted by themes (
identity, friendship, school stories, award winners, etc.), and the last holds picture books, magazines, and poetry.
This set up gives my learners the opportunity to browse the baskets they want without the stigma of being a high or low reader. They can take the basket and find a Just Right book for them inside.
I am very lucky to have a TA who listed all of the titles in each basket to create a catalogue for my students to quickly skim and to help them put their finished books back in the right place. You could get a student, parent volunteer, or friend to help you put this together. At the end of the year (or at break) you will have a quick Cheat Sheet to help your library get back in order.
I think that is enough for now. The main thing to remember,
get organized NOW and save yourself a headache later!!!
Best of luck!
~Michelle Louise